MIGRATE CONFIGURATION TO CITRIX CLOUD USING AUTOMATED CONFIGURATION TOOLS

Why use Automated Configuration IT administrators in charge of large or complex environments often find migrations to be a tedious process. They frequently end up writing their own tools to accomplish this task successfully since it tends to be specific to their use cases.
Open Architecture Systems will assist or even do the migration on the client’s behalf thus easing the process by using Citrix’s Automated Configuration tool.
OAS working with IT administrators can easily test current configurations in Citrix Cloud and take advantage of the benefits offered by Citrix DaaS (formerly Citrix Virtual Apps and Desktops service) while keeping the current environments intact. There is also no end user impact, as Automated Configuration works seamlessly in the background. Such benefits include reduced administrative overload when Citrix manages part of the back-end and control plane, automatic and customizable Citrix Cloud component updates, and others.
Citrix uses industry-standard configuration as code to provide a mechanism to help automate migration processes.
Automated Configuration discovers and exports one or more on-premises sites as a collection of configuration files. These files’ configuration can then be imported into Citrix DaaS. Automated Configuration also allows administrators to merge multiple on-premises sites into a single site, while avoiding name collisions.
Administrators can control whether the on-premises or cloud configuration controls resources.
Automated Configuration is not just a onetime migration tool but can also automate the day-to-day configuration in Citrix Cloud.
Moving Citrix DaaS configuration can be beneficial for many reasons:
- Syncing the site from test or stage to production
- Backing up and restoring the configuration
- Reaching resource limits
- Migrating from one region to another
For additional information on Automated Configuration, see Proof of Concept: Automated Configuration Tool on Tech Zone.
For a deeper look into moving the deployment and readying the on-premises configuration for migration, see Deployment Guide: Migrating Citrix Virtual Apps and Desktops from on-premises to Citrix Cloud on Tech Zone.
Download Automated Configuration
Download and install the Automated Configuration tool from Citrix Downloads.
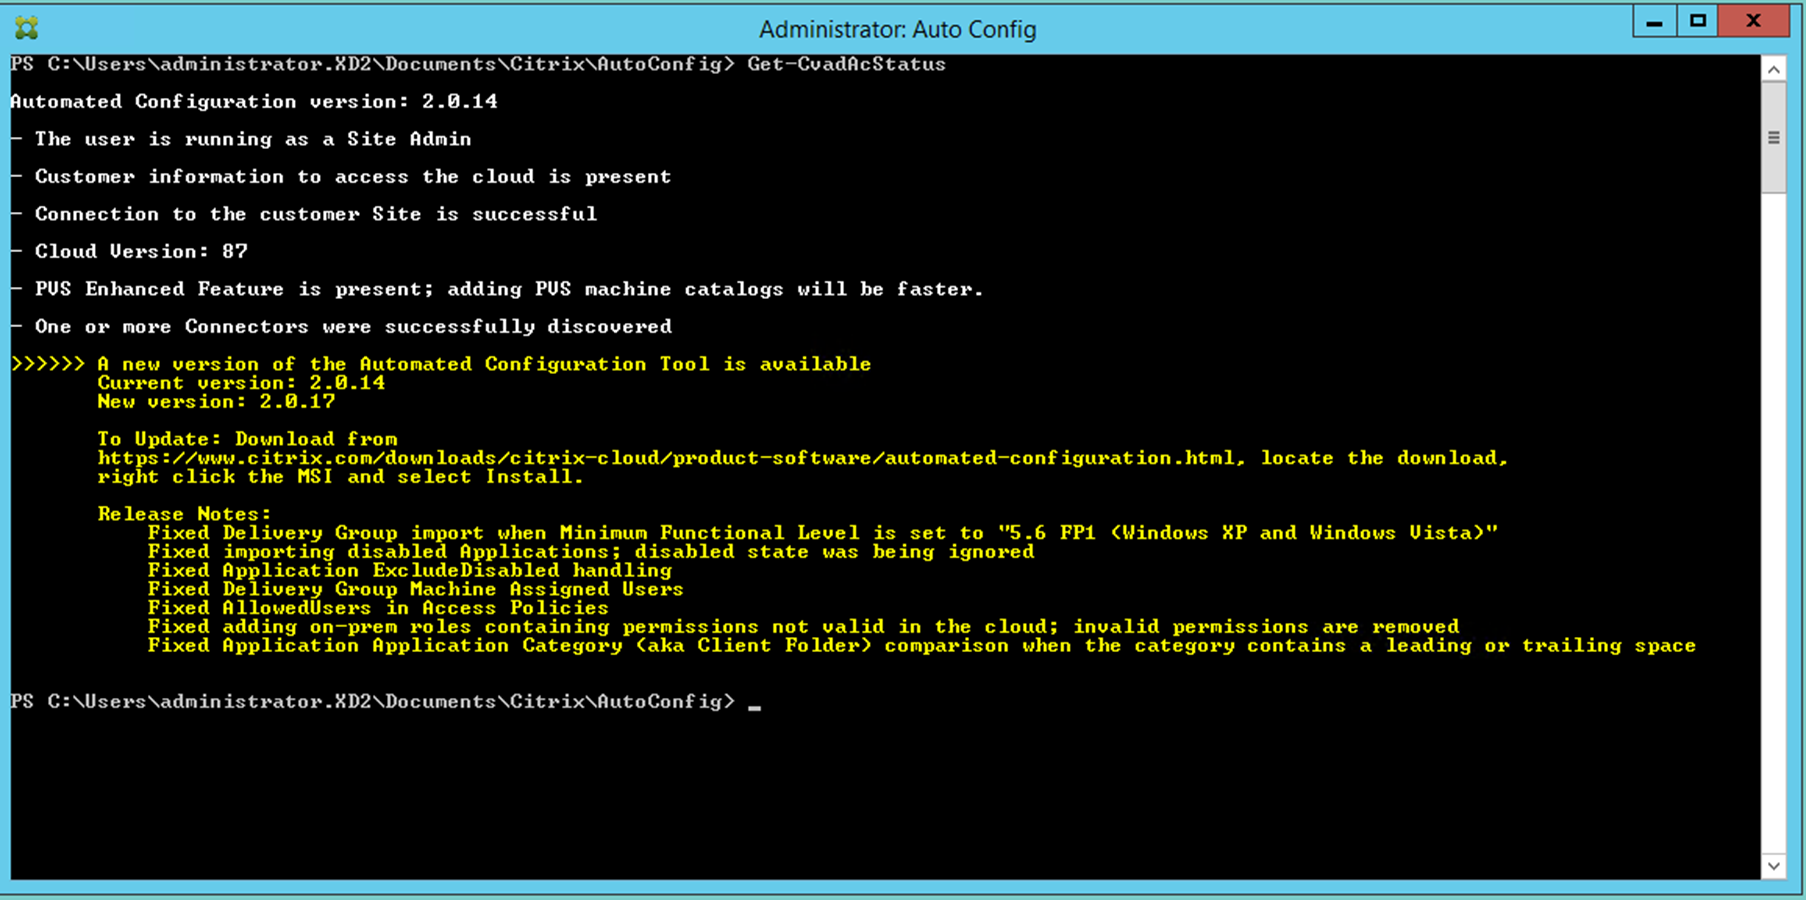
IMPORTANT: To prevent errors in functionality, always use the latest available version of Automated Configuration.
Upgrading Automated Configuration when running cmdlets that access the cloud in Automated Configuration, the tool sends alerts as to when there is a newer version available for download.
To ensure the use of the latest version, follow the steps below:
- Double-click the Auto Config icon. A PowerShell window appears.
- Run the following command to check your version number.
Get-CvadAcStatus
- Check the tool version against the version listed in the alert or at Citrix Downloads.
- Download and install the latest version of the tool. There is no need to uninstall the old version to upgrade Automated Configuration.
NOTE: The alert appears every time a cmdlet that accesses the cloud is run. For more information on cmdlets, see Automated Configuration tool cmdlets.
Known limitations.
- Machine catalogues provisioned through Machine Creation Services have special considerations. For more information on MCS, see Understanding migrating Machine Creation Services provisioned catalogues.
Supported migration objects. Automated Configuration supports moving the configuration of the following components:
- Tags
- Delegated Admin
- Scopes
- Roles
- Host Connections
- A Single Resource Pool
- Admin Scopes
- Machine Catalogues
- Admin Scopes
- Machines
- Remote PC Access, Physical, Pooled, Provisioned, MCS, Assigned
- StoreFronts
- Delivery Groups
- Access Policy
- Admin Scope Association
- Application Access Policy
- Assignment Policy
- Entitlement/Desktop Policy
- Power Schedules
- Session Lingering
- Session Prelaunch
- Reboot Schedules
- Tags
- Application Groups
- Admin Scope Association
- Delivery Groups
- Users and Groups
- Applications
- Application Folders
- Icons
- Applications
- Broker Configured FTAs
- Tags
- Group Policies
- User Zone Preferences
Component migration order
The components and their dependencies are listed here. A component’s dependencies must be in place before it can be imported or merged. If a dependency is missing, it can cause the import or merge command to fail. The Fixups section of the log file shows missing dependencies if an import or merge fails.
- Tags
- Delegated Admin
- No pre-dependencies
- Host Connections
- Security Information in CvadAcSecurity.yml
- Machine Catalogues
- Machines present in Active Directory
- Host Connections
- Tags
- Storefronts
- No pre-dependencies
- Delivery Groups
- Machines present in Active Directory
- Users present in Active Directory
- Machine Catalogues
- Tags
- Application Groups
- Delivery Groups
- Tags
- Applications
- Delivery Groups
- Application Groups
- Tags
- Group Policies
- Delivery Groups
- Tags
- User Zone Preferences
Common prerequisites
The following are some common prerequisites that are needed for Automated Configuration to work correctly. These prerequisites are used in both on-premises to cloud and cloud to cloud migrations.
Generating the customer ID, client ID, and secret key
Before you begin your migration using Automated Configuration, you need your Citrix Cloud customer ID and you must create a client ID and a secret key to import your configuration to Citrix Cloud. All cmdlets accessing the cloud require these values. The following steps allows for the retrieval of the customer ID and create the client ID and secret key.
To retrieve the Customer ID:
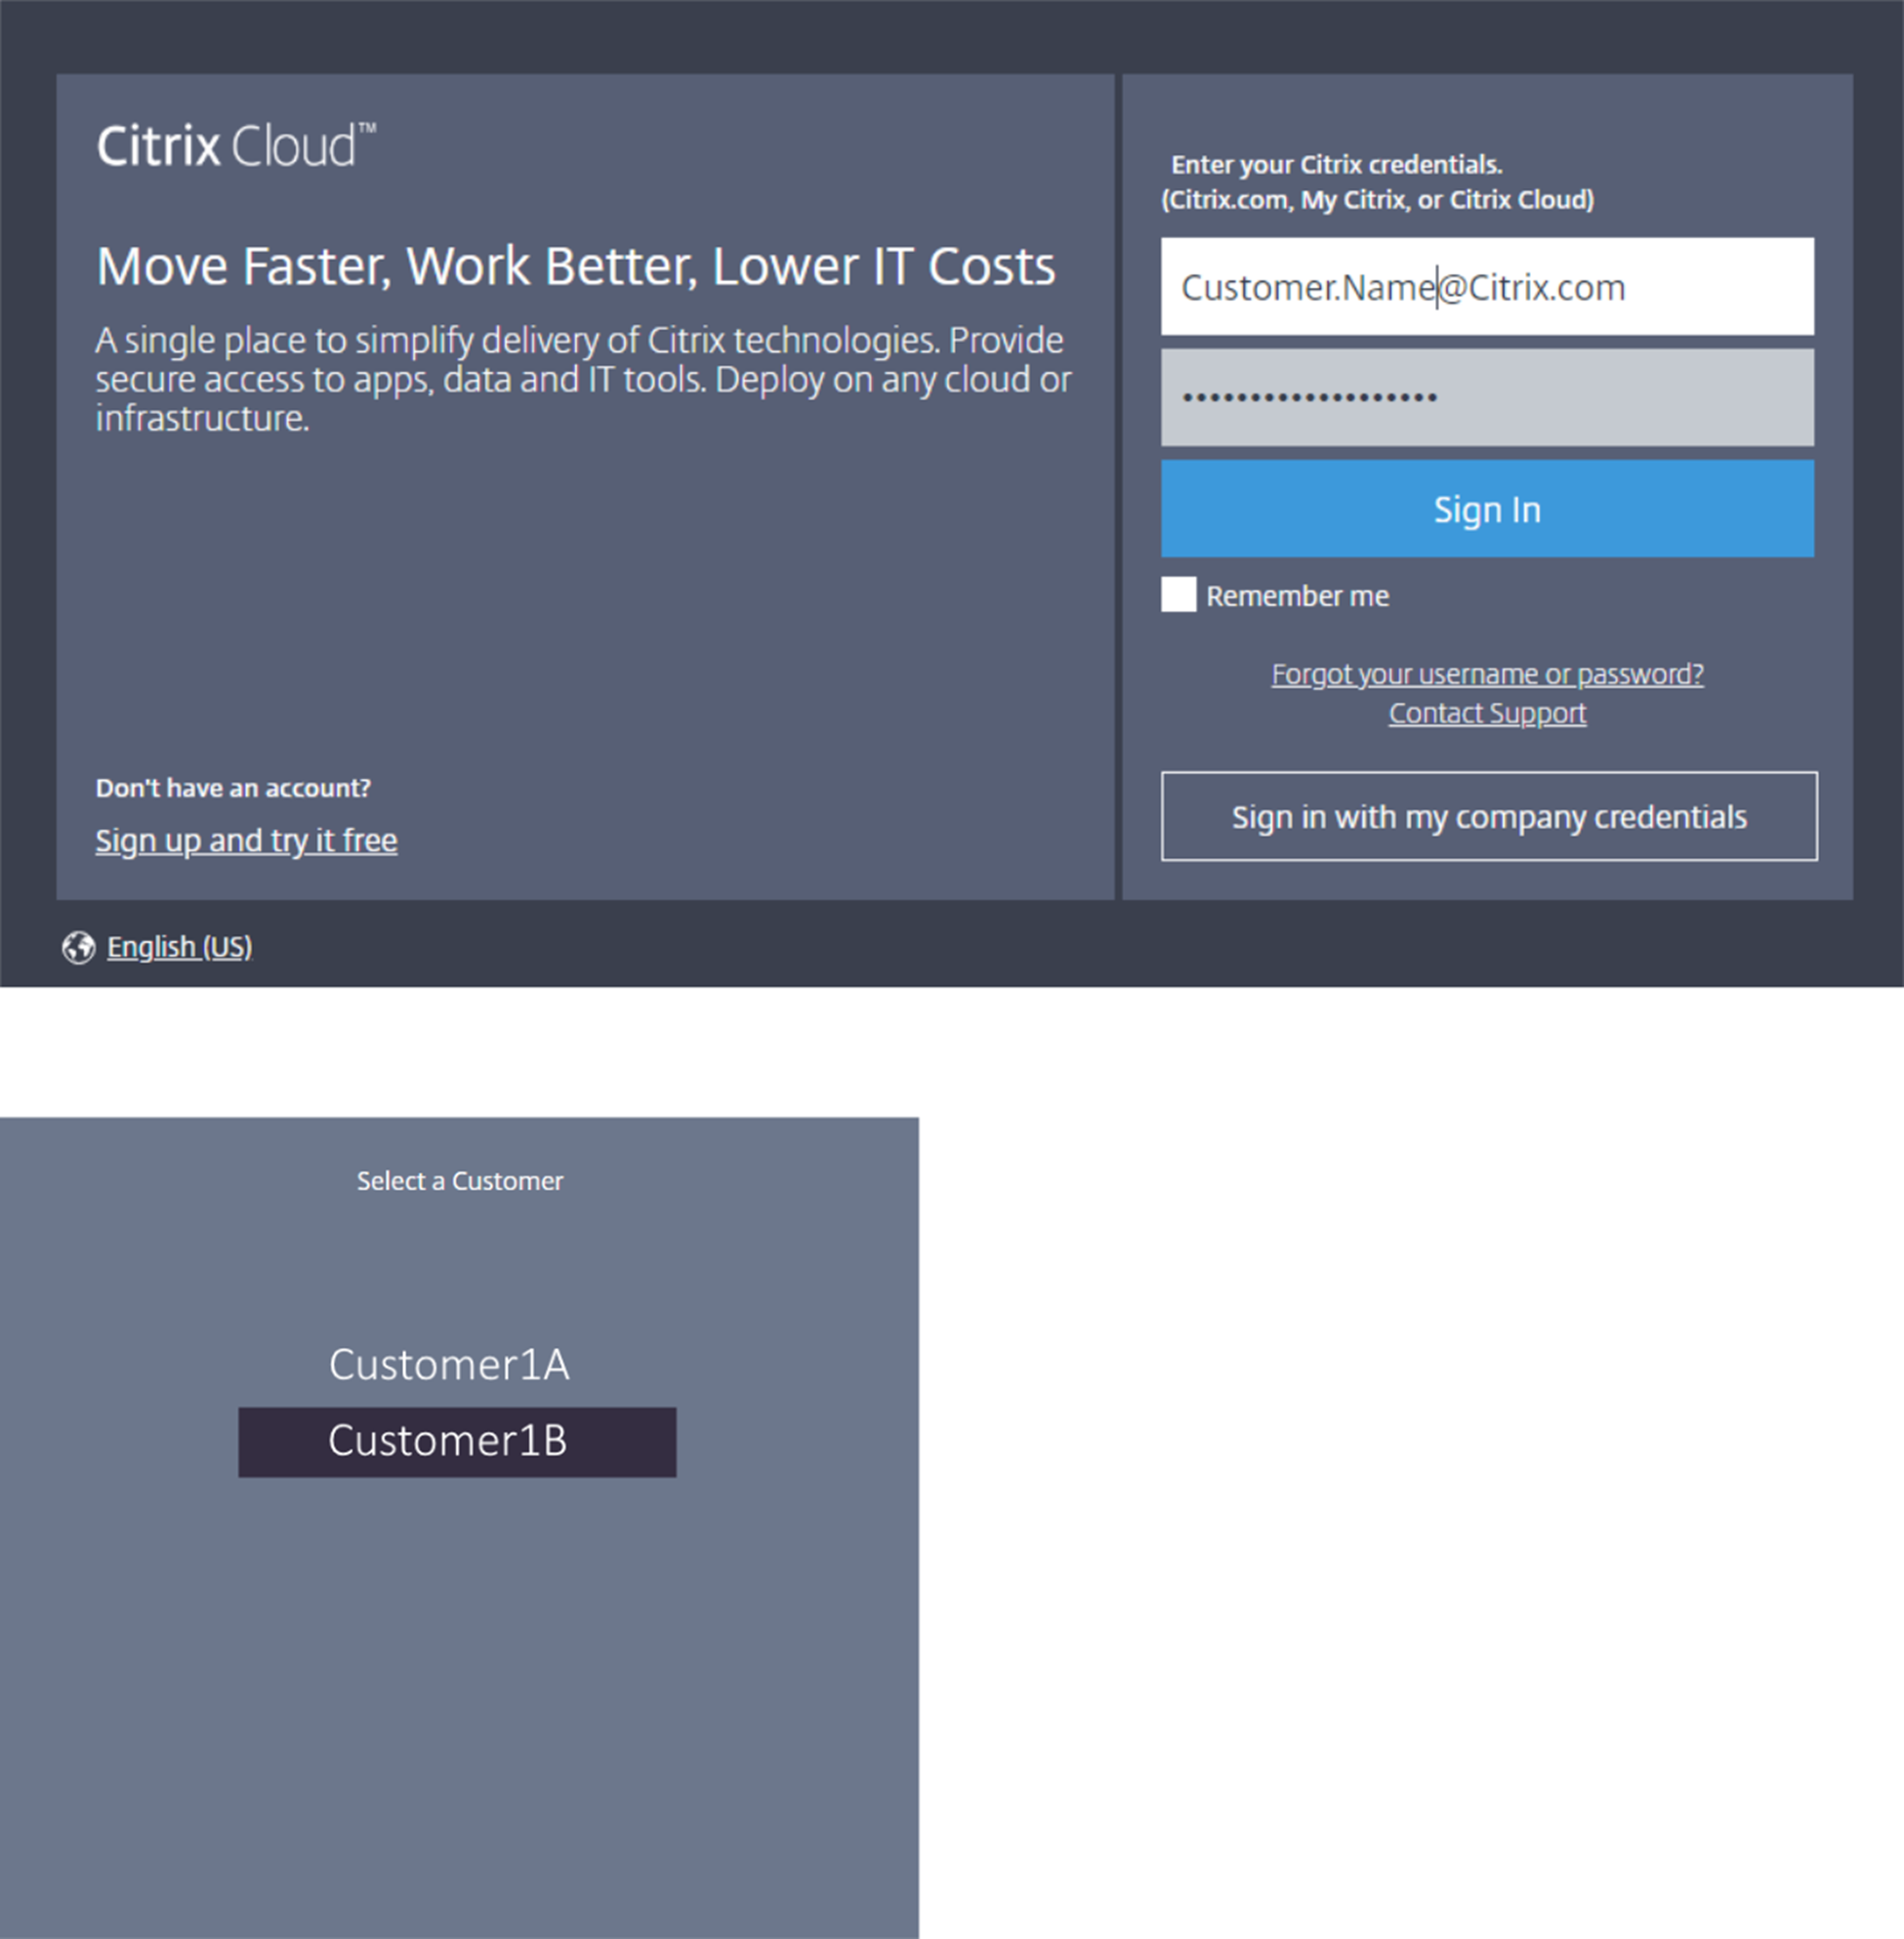
- Sign into the company’s Citrix Cloud account and select the customer.
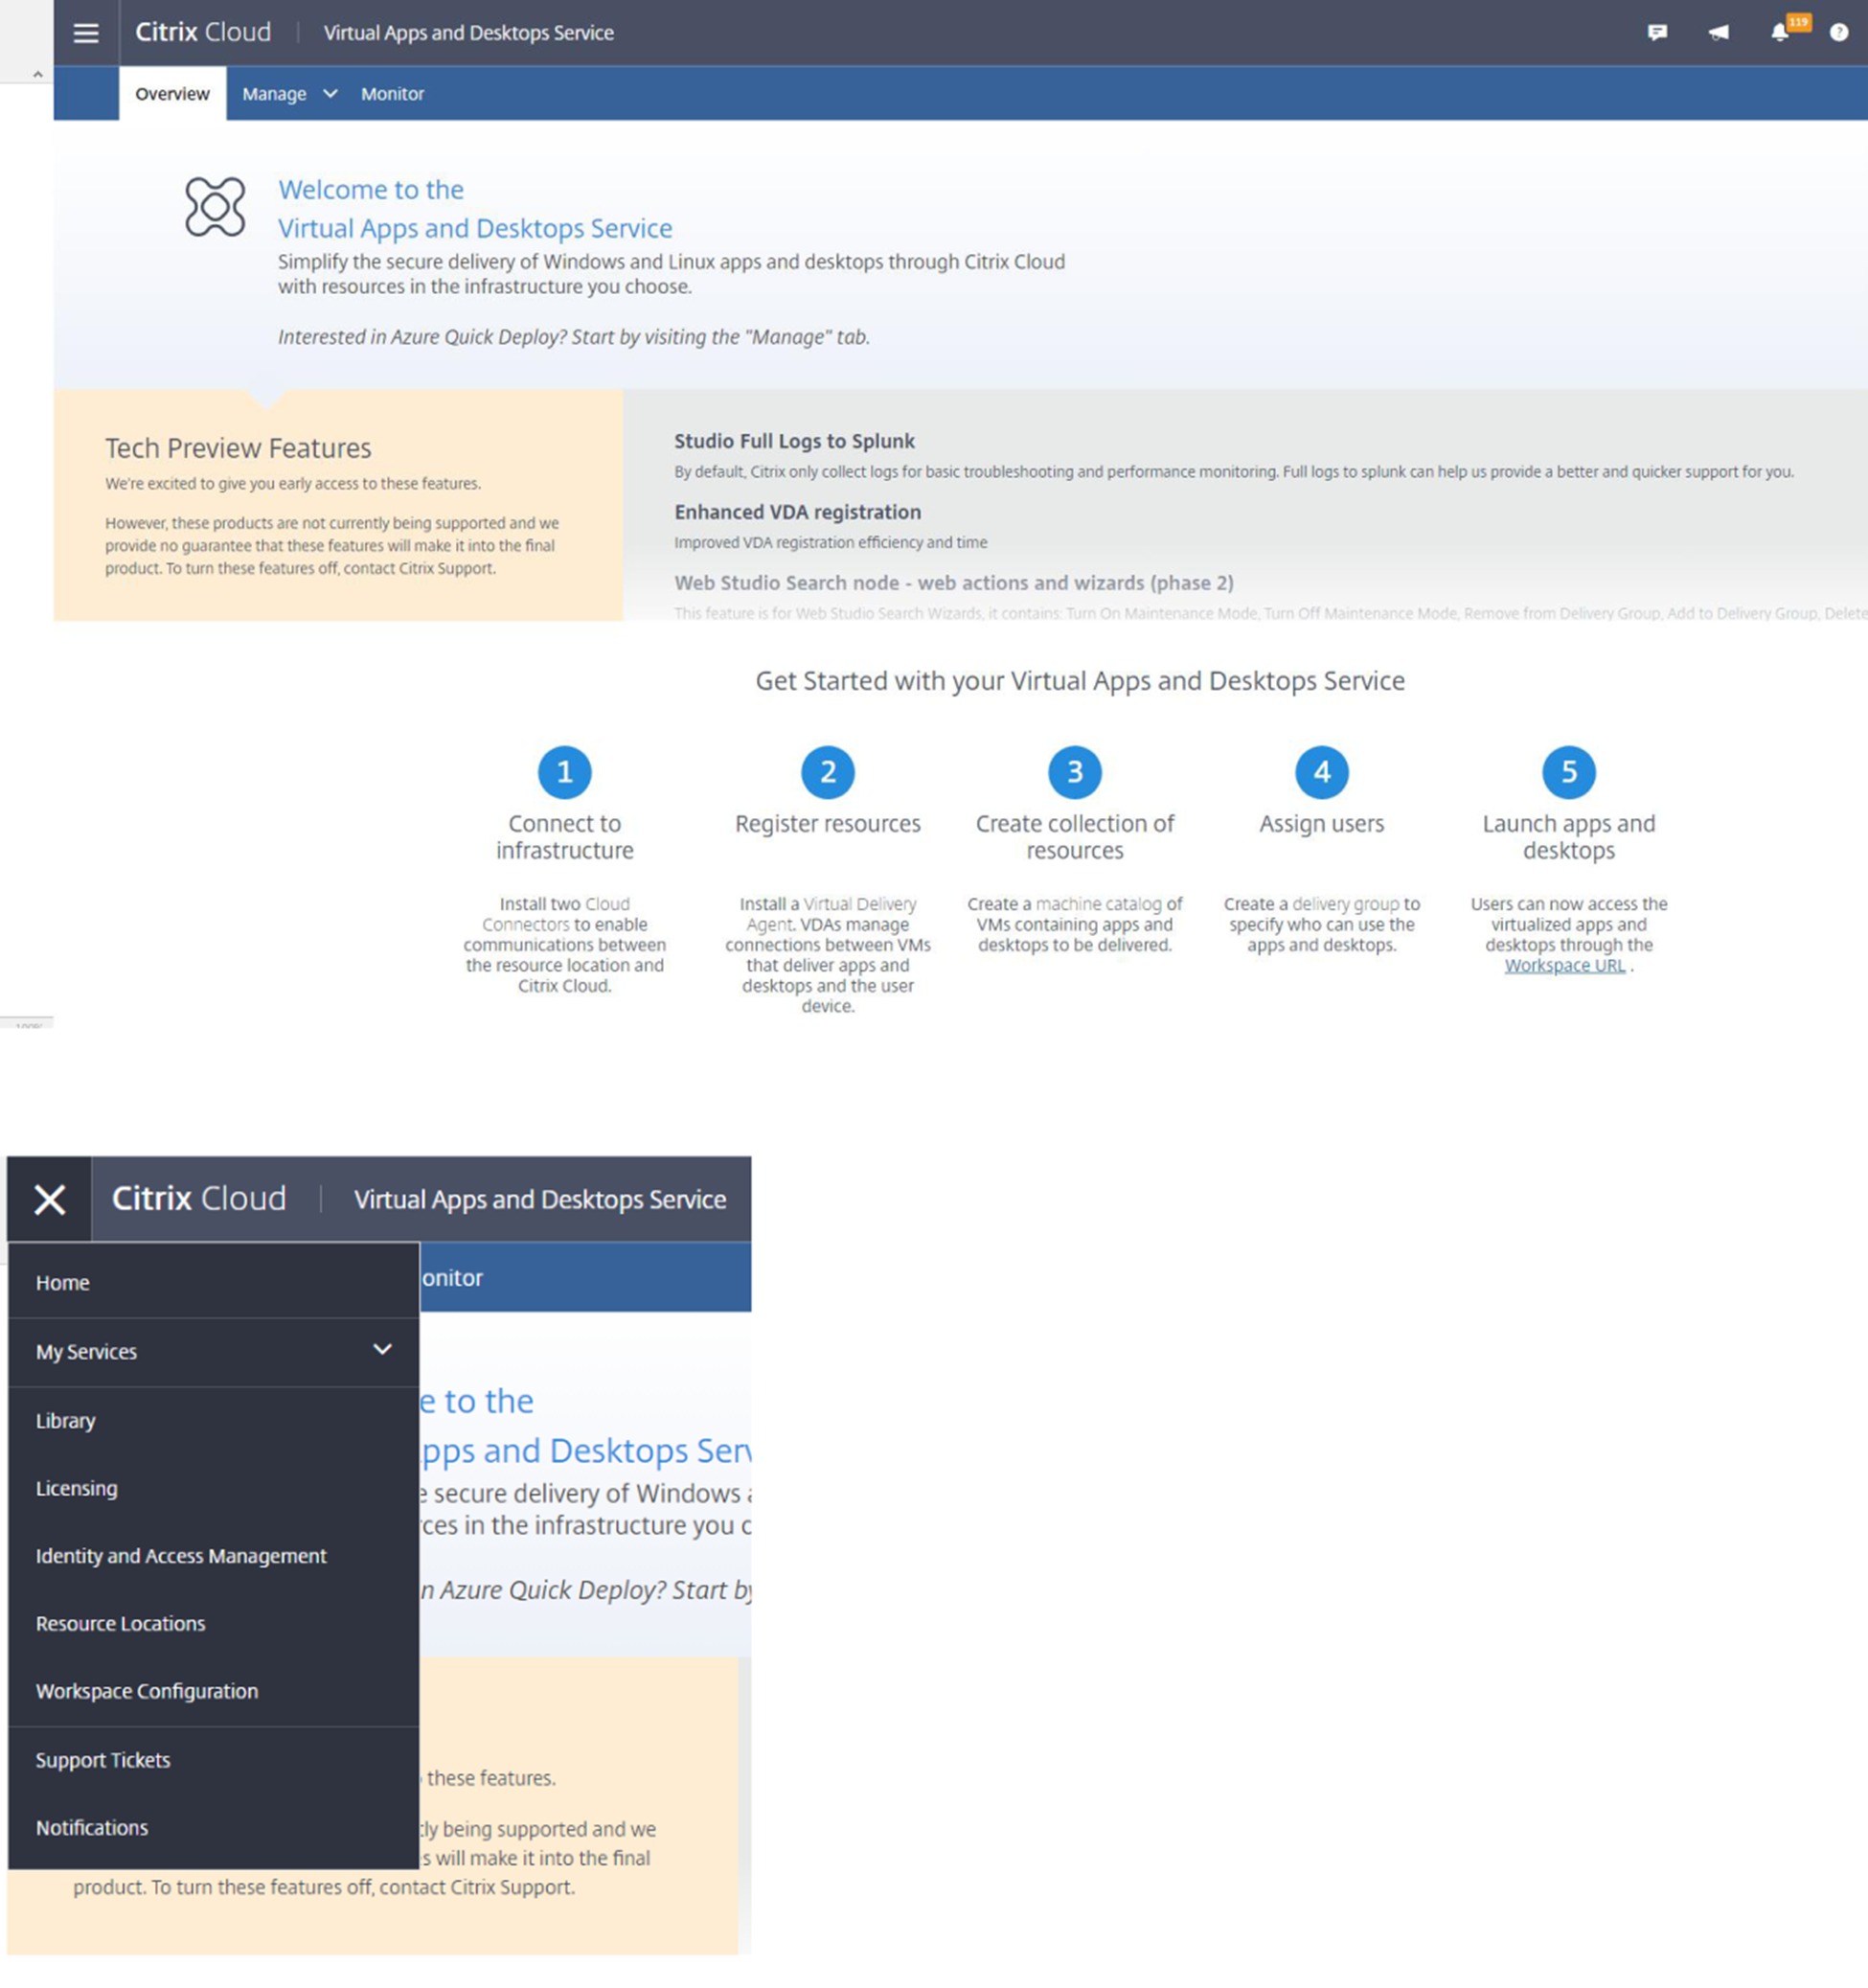
- Click the hamburger menu, then select Identity and Access Management in the drop-down menu.
- The Customer ID is located on the Identity and Access Management page.
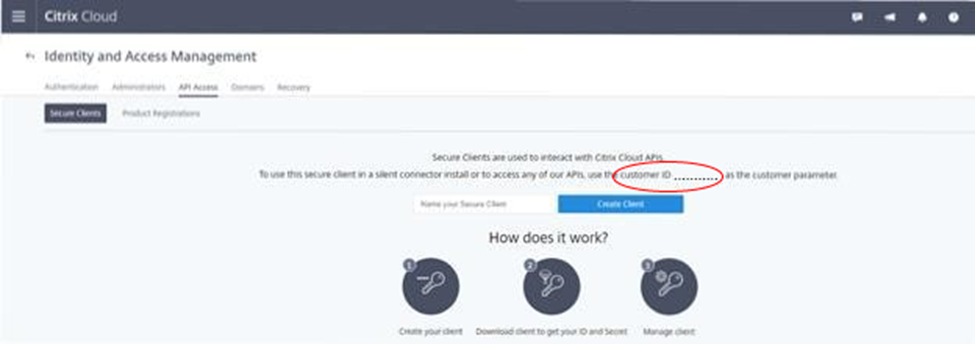
To retrieve the Client ID and Secret Key:
- On the Identity and Access Management page, click the API Access tab.
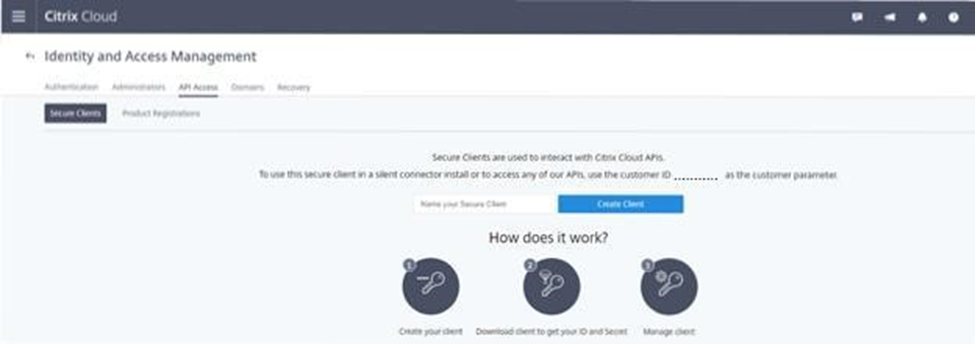
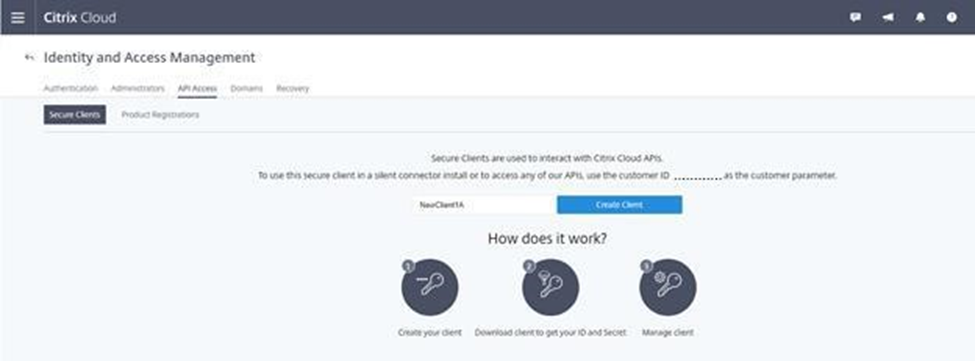
- Enter a name in the box. This name is used to differentiate between multiple client IDs and secret keys. Click Create Client to create the client ID and the secret key.
- The following dialog appears after you successfully create the client ID and the secret key. Be sure to copy both values to a secure location and download the .csv file containing this information. The .csv file can be used to create the CustomerInfo.yml file.
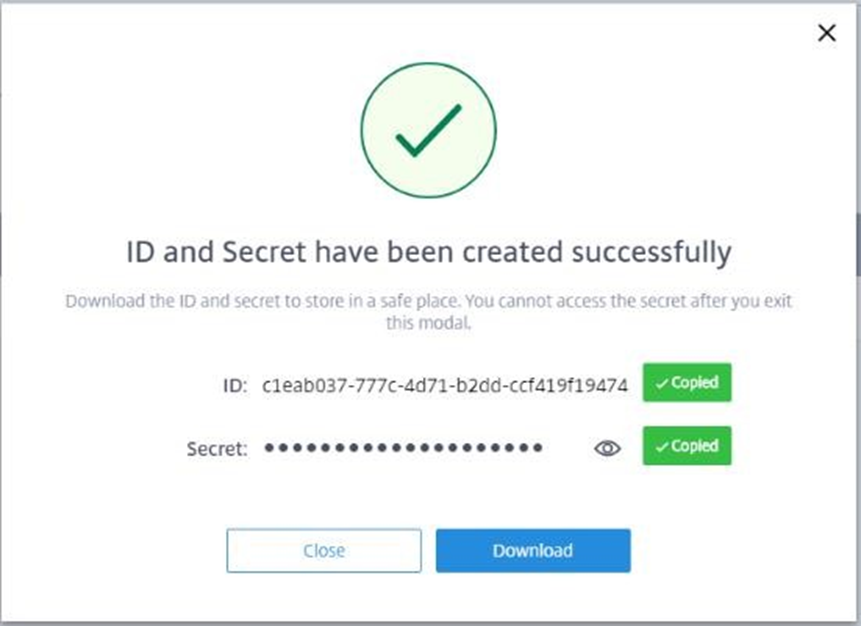
- The client ID and the secret key are successfully created.

Place these values in a secure location and share only with trusted company members who need access to the tool or access the cloud Rest APIs.
The client ID and secret key do not expire. If they are compromised, immediately remove them by using the Trash icon and create new ones.
NOTE: The secret key cannot be retrieved if it is lost or forgotten; a new client ID and secret key must be created.
Populating customer info file
Using the CustomerInfo.yml file eliminates the need to provide customer information parameters with each cmdlet’s execution. Any of the customer information can be overridden by using cmdlet parameters.
Create the CustomerInfo.yml file by using the New-CvadAcCustomerInfoFile cmdlet.
IMPORTANT: Do not manually edit the CustomerInfo.yml file. Doing so can cause inadvertent formatting errors.
types of catalogues:
- When changes made to a machine are lost/reversed (Commonly Server OS, where applications are published) – this is a pooled VDI / multi-session use case
- When changes made to a machine are preserved across reboot (Commonly client OS with a dedicated user) – this is a static VDI use case
The type of catalogue can be confirmed in the catalogue node in Citrix Studio and looking at the “User data:” value of the catalogue.
Note: MCS cannot be backed up from the cloud using Automated Configuration. New-CvadAcCustomerInfoFile has the following required parameters.
New-CvadAcCustomerInfoFile has the following required parameters.
- CustomerId – customer’s ID.
- ClientId – customer’s client ID created on Citrix Cloud.
- Secret – customer’s secret created on Citrix Cloud.
MCS cannot be backed up from the cloud using Automated Configuration. New-CvadAcCustomerInfoFile has the following required parameters.
- CustomerId – customer’s ID.
- ClientId – customer’s client ID created on Citrix Cloud.
- Secret – customer’s secret created on Citrix Cloud.
New-CvadAcCustomerInfoFile -CustomerId markhof123 -ClientId 6813EEA6-46CC-4F8A-BC71-539F2DAC5984 -Secret TwBLaaaaaaaaaaaaaaaaaw==
Create the CustomerInfo.yml using the SecurityCsvFileSpec parameter that points to the downloaded security.csv file. Specify the CustomerId.
New-CvadAcCustomerInfoFile -SecurityCsvFileSpec C:\Users\my_user_name\downloads/security.csv -CustomerId markhof123
Update the CustomerInfo.yml file by using the Set-CvadAcCustomerInfoFile cmdlet. This cmdlet only changes the Client ID.
Set-CvadAcCustomerInfoFile -ClientId C80487EE-7113-49F8-85DD-2CFE30CC398E
The following is a sample CustomerInfo.yml file.
# Created/Updated on 2020/01/29 16:46:47
CustomerId: ‘markhof123’
ClientId: ‘6713FEA6-46CC-4F8A-BC71-539F2DDK5384’ Secret: ‘TwBLaaabbbaaaaaaaaaaw==’
Environment: Production
AltRootUrl: ‘’
StopOnError: False
AlternateFolder: ‘’
Locale: ‘en-us’
Editor: ‘C:\Program Files\Notepad++\notepad++.exe’ Confirm: True
DisplayLog: True
Populating zone mapping file
An on-premises zone is the equivalent of the cloud resource location. Unlike other site components, you cannot import the on-premises zone to the cloud automatically. Instead, it must be manually mapped using the ZoneMapping.yml file. Import failures can occur if the zone name is not associated with an existing resource location name.
For on-premises sites having only one zone and cloud sites only one resource location, the Automated Configuration tool makes the correct association, eliminating the need to manually manage the ZoneMapping.yml file.
For on-premises sites having multiple zones or cloud sites having multiple resource locations, the ZoneMapping.yml file must be manually updated to reflect the correct mapping of on-premises zones to cloud resource locations. This must be done before attempting any import operation to the cloud. The ZoneMapping.yml file is located in %HOMEPATH%\Documents\Citrix\AutoConfig. The content of the .yml file is a dictionary with the zone name as the key and the resource location name as the value.
As an example, an on-premises Citrix Virtual Apps and Desktops site with a primary zone called “Zone-1” and a secondary zone called “Zone-2” is migrated to a Citrix DaaS deployment with two newly created cloud resource locations called “Cloud-RL-1” and “Cloud-RL-2”. In this instance, the ZoneMapping.yml would be configured as follows:
Zone-1: Cloud-RL-1
Zone-2: Cloud-RL-2
NOTE: A space must be between the colon and resource location name. If spaces are used in the zone or resource location name, enclose the name with quotes.
Host connections
Host connections and their associated hypervisors can be exported and imported using Automated Configuration.
Adding a hypervisor to a host connection requires security information specific to the type of hypervisor.
This information cannot be exported from the on-premises site for security considerations. It must manually provide the information so that Automated Configuration can successfully import host connections and hypervisors to the cloud site.
The export process creates the CvadAcSecurity.yml file in %HOMEPATH%\Documents\Citrix\AutoConfig containing placeholders for each security item needed for the specific hypervisor type. It is important to update the CvadAcSecurity.yml file before importing into the cloud site. Administrator updates are retained over multiple exports with new security placeholders added as needed. Security items are never removed. For more information, see Manually update the CvadAcSecurity.yml file
HostConn1:
ConnectionType: XenServer
UserName: root
PasswordKey: rootPassword
HostCon2:
ConnectionType: AWS
ApiKey: 78AB6083-EF60-4D26-B2L5-BZ35X00DA5CH SecretKey: TwBLaaaaaaaaaaaaaaaaaw==
Region: East
Per-hypervisor security information
The following lists the security information required for each hypervisor type.
- XenServer, Hyper-V, VMware
- User Name
- Clear-text Password
- Microsoft Azure
- Subscription ID
- Application ID
- Application Secret
- Amazon Web Services
- Service Account ID
- Application Secret
- Region
Special security considerations
All security information is entered as clear text. If clear text is not recommended, the host connections and associated hypervisors can be manually created using the Manage > Full Configuration interface. The host connections and hypervisor names must match their on-premises counterparts exactly so that machine catalogues that use the host connections can be successfully imported. Activating sites
The delivery controller in both on-premises and cloud sites control resources such as brokering desktops, applications, and rebooting machines. Problems occur when a common set of resources is controlled by two or more sites. Such a situation can occur when migrating from an on-premises site to a cloud site. It is possible for both the on-premises and cloud delivery controllers to manage the same set of resources. Such dual management can lead to resources becoming unavailable and unmanageable and can be difficult to diagnose.
Site activation allows for control where the active site is controlled.
Site activation is managed using the delivery group maintenance mode. Delivery groups are placed in maintenance mode when the site is inactive. Maintenance mode is removed from delivery groups for sites that are active.
Site activation does not affect or manage VDA registration or machine catalogs.
- Set-CvadAcSiteActiveStateCloud
- Set-CvadAcSiteActiveStateOnPrem
All cmdlets support the IncludeByName and ExcludeByName filtering. This parameter allows the selection as to which delivery groups can have their maintenance mode changed. Delivery groups can be selectively changed as needed.
Import and transferring control to the cloud
The following is a high-level description on how to import and transfer control from the on-prem site to the cloud site.
- Export and import the on-premises site to the cloud. Make sure the –SiteActive parameter is not present on any of the import cmdlets. The on-premises site is active and the cloud site inactive. By default, cloud site delivery groups are in maintenance mode.
- Verify the cloud content and configuration.
- During off hours, set the on-premises site to inactive. The –SiteActive parameter must be absent. All on-premises site delivery groups are in maintenance mode.
- Set the cloud site to active. The –SiteActive parameter must be present. No cloud site delivery groups are in maintenance mode.
- Set-CvadAcSiteActiveStateOnPrem
- Verify that the cloud site is active and the on-premises site is inactive.
Transferring control back to the on-premises site
To transfer control from the cloud site to the on-premises site:
- During off hours, set the cloud site to inactive. All cloud site delivery groups are in maintenance mode.
- Set the on-premises site to active. No on-prem site delivery groups are in maintenance mode.
- Set-CvadAcSiteActiveStateOnPrem -SiteActive
Additional site activation information
- If no machines are power managed and there are no reboot schedules (which usually means there are no host connections either) all cloud delivery groups can be imported as active. Add -SiteActive to Merge-CvadAcToSite/Import-CvadAcToSite or run Set-CvadAcSiteActiveStateCloud -SiteActive after importing.
- If machines are power managed or there are reboot schedules, a different process is needed. For example, when switching from on-premises to cloud in this situation, set the on-premises site to inactive using Set-CvadAcSiteActiveStateOnPrem. Then, set the cloud site to active using Set-CvadAcSiteActiveStateCloud -SiteActive.
- The Set-CvadAcSiteActiveStateCloud and Set-CvadAcSiteActiveStateOnPrem cmdlets are also used to reverse the process. For example, run Set-CvadAcSiteActiveStateCloud without the -SiteActive parameter, then run Set-CvadAcSiteActiveStateOnPrem with the -SiteActive parameter.
Understanding migrating Machine Creation Services provisioned catalogues.
NOTE: This feature is available only on versions 3.0 and later. Check the version by using Get-CvadAcStatus within Automated Configuration.
Machine Creation Services (MCS) catalogs create two different
Pooled VDI / multi-session catalogues
Catalogues with “User data: Discard” are pooled VDI catalogues and can only migrate the main image and configuration. Any virtual machines in these catalogues are not migrated. This is because the life cycle of the virtual machine is maintained by the site from which it is being importing from, which means every time the machines are turned on, its state might change. This makes import impossible as the import data for the virtual machines quickly gets of out of sync.
When migrating these catalogues using the tool, it creates catalogue metadata and initiates main image creation, but no machines are imported. Since this process can take some time to be created based on the size of the main image, the import command within the tool only starts the MCS catalogue creation and does not wait for it to finish. After the import has completed, monitor the catalogue create progress using the Full Configuration management interface in the cloud deployment.
Once the main image is created, it can provision machines. Capacity considerations need to be considered since it would have capacity consumed from the on-premises usage.
All other objects (delivery groups/applications/policies, and so forth) that use that catalogue can be imported and do not have to wait for the main image creation. When the catalogue has finished creating, machines can be added to the imported catalogue and then users can launch their resources.
NOTE: Use the same commands available within the tool to migrate catalogues and all other objects.
Static VDI catalogues
NOTE: Since this operation imports low-level details that are stored in the database, this process must be run from a machine with database access.
Static VDI catalogues migrate the main image, configurations, and all virtual machines. Unlike the pooled VDI use case, no images need to be created.
The VDAs must be pointed to the connector for them to register with the cloud.
Refer to the Activating sites section to make the cloud site active, so that the reboot schedule, power management, and other items are controlled by the cloud.
Once the migration is completed, if needed, to delete this catalogue from the on-premises site, select leave VM and AD account. Otherwise, they are deleted, and the cloud site would be left pointing to the deleted VM.